将 App Inventor 2 项目连接到外部传感器
注意:本报告描述了2014年春季在麻省理工学院电气工程与计算机科学系进行的本科高级项目工作。这项工作得到了Google ATAP的资助支持。
介绍
App Inventor 是一种基于可视化”积木块”的编程语言,用于开发Android应用程序。它让用户能够通过连接各种代码块,在即插即用的环境中轻松学习、创建和原型设计。
目前,AppInventor的工具集主要专注于软件体验的原型设计,创建了许多利用Android系统服务的代码块,例如发送和接收短信或从网络读取信息。这项工作的重点是将AppInventor的工具集扩展到物理空间,让用户能够轻松地与外部传感器、执行器和其他硬件进行交互。
MOIO板[1]是一种低成本、可编程的微控制器,可以为各种应用提供输入/输出功能。通过为AppInventor构建IOIO/MOIO板支持,创建机器人套件和配套教程,我们希望让硬件编程更加易于接触。
套件内容
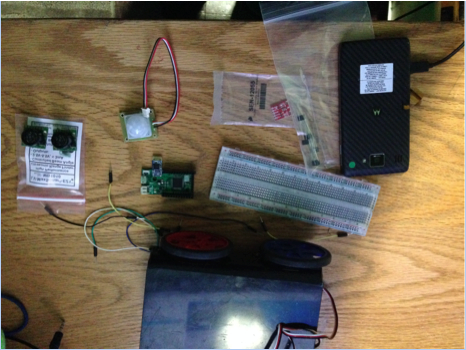
传感器方面,套件包括一个光敏传感器、一些光敏电阻和两个超声波传感器。这些应该足以满足各种应用需求,例如光线跟随和墙壁跟随。以下是完成套件的图片:
MOIO板(原理图可在此处获取)[2] Android手机(运行4.3或更高版本)[3] (1) 光敏传感器 光敏电阻 (2) 超声波传感器
以下是完成套件的图片:
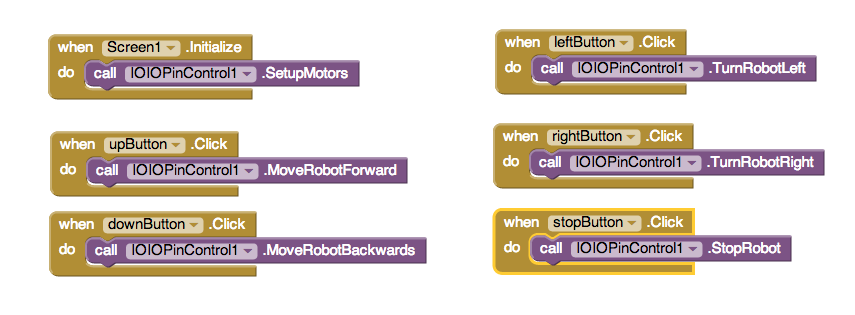
代码块
为这个套件设计的App Inventor代码块是简单、易于解析的方法,如”MoveRobotForward”(向前移动机器人)、”TurnRobotRight”(向右转动机器人)和”StopRobot”(停止机器人)。这些代码块也不接受任何参数,以减少用户的困惑。这种方法的一个后果是,硬件必须对所有用户都相同,并遵循规定的接线原理图。预定义的硬编码端口如下:
前右电机:端口10
前左电机:端口11
后右电机:端口12
后左电机:端口13
超声波传感器:端口36
亮度传感器:TwiMaster 1
为了初始化所有电机以供使用,必须在应用程序启动且屏幕初始化时调用”SetupMotors”方法。以下是新代码块使用起来多么简单的示例:
教程
使用这些代码块的教程可以在此处找:
端口、接线和API
作为参考,前右电机是端口10,前左是端口11,后右是端口12,后左是端口13。超声波传感器已连接到端口36,亮度传感器设置为使用TwiMaster 1。
代码
该项目的代码可在GitHub上获取。主要源代码在此处,项目的主要类/亮点在此处
引用
除了App Inventor代码外,以下网站提供了将亮度传感器连接到IOIO板的代码。来自此博客的代码被直接使用和修改。BrianDorey.com
致谢 我首先要感谢Hal Abelson教授赞助和监督这个项目,并为项目的方向提供指导和反馈。我还要感谢José Dominguez协助项目的软件方面,以及Ilaria Liccardi协助项目的硬件方面。最后,我要感谢整个App Inventor团队对平台的持续工作。
 扫码添加客服咨询